Latch hook doesn’t have to be “your grandmother’s latch hook” anymore! These pieces add color and texture to spaces and can add a vintage flair. Yes, you can find real vintage pieces, but sometimes it’s hard to find something that fits into your space exactly how you want it to.
You can make free form shapes, tapestry pieces, or go the more traditional rug route.
You do not need a ton of supplies and this is a relatively easy project, you just need to have the patience to work on it.
If you plan your project, it will be less tedious and easy to pick up and work on when you have a few free spare minutes while you Netflix.
SUPPLIES
- latch hook tool
- latch hook grid fabric (rug canvas)
- yarns of your choice
- plastic finishing needle
- felt for backing
- way to hang your piece like a wooden dowel
- sharp scissors
HOW TO
PLAN YOUR PIECE
- Plan your piece, or don’t! I’m the queen of freestyling a piece based on the mood I’m in or how I’m feeling. I don’t like my creativity to feel constricted if I come up with a better idea. Mark with a permanent marker on your grid where you want to add yarn. You can denote the shapes you want and the colors you want to use.
- Once you decide what you’d like to make, you need to cut your grid to the correct size. Make sure to leave an inch of extra material on all sides of your piece.
- Cut your yarn pieces. I start with one color. You can wrap the yarn around your fingers and them cut them once to create your strands. You can also wrap the yarn around a cardboard strip for more uniform pieces. When you cut your yarn, the pieces will be double the pile height of your final product. Pile height is how high the yarn stands up form the rug canvas.
START CREATING YOUR PIECE
- I like starting from one side of a piece and working towards the other side.
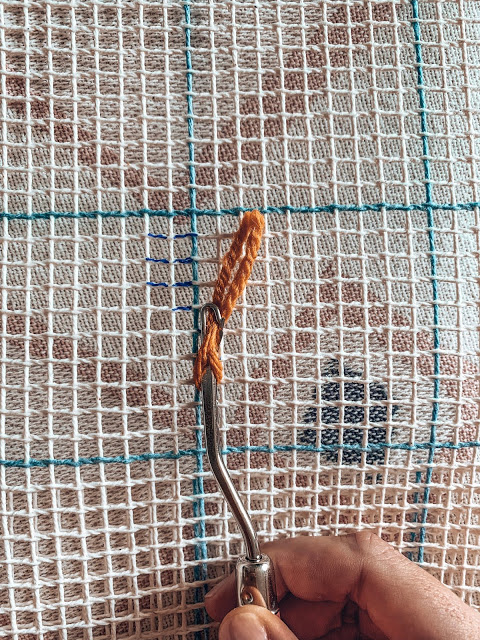
- To attach your first piece of yarn, put the tool under the horizontal piece of grid you want to attach the yarn to, then bring it up in the square immediately above. Hold the hook tool in your dominant hand.
- Bring both ends of the yarn around the tool with your other hand, folding the yarn in half. Bring them up towards the hook end of the tool.
- Bring the ends of the yarn around the latch and secure it in the hook by bringing the hook down with your other hand.
- Pull down on the hook and let go of the yarn. Pull the yarn down with the tool and release the hook from the grid.
- Your yarn should be attached now and you can pull it down with your hand just to make it extra secure.
TIPS
- This is a great way to use your yarn scraps
- Try thinking of unconventional ways to use the latch hook technique. You can make beautiful tapestry pieces that mimic the look of a weaving.
- When you use yarns of different weights and materials, don’t be afraid to double up and use two pieces of yarn per square to ensure even coverage.
- Experiment with cutting different sections of yarn to different pile heights to emphasize certain parts of your design.
I hope this intro to latch hook gives you all the tools you need to start your first piece! Share the progress of your first piece over on Instagram and make sure to use the hashtag #chasingcozy so I can share your work!


Leave a Reply